|

*Step 1
Open a new image, 400x400 pixels, transparant
Change the foreground to Gradient. Search for the gradient Metal -
Steel
(0-0-deselect invert) Style = linear
Flood fill the image with the gradient.
Add a new raster layer.
Drag a rectangle on the bottom off your image from the left to
the right and flood fill this with black.

Selections - Select none!!!!
Effects - Reflection - Feedback (Apacity and Intensity to
100, the rest on 0)
Effects - 3D effects - Drop Shadow 1-1-65-1
Repeat the Dopshadow, but place a minus before the 1 from vertical en
horizontal
Step 2
Make sure you're on the button layer in
the layerpalette again.
Now drag a rectangle from the corner
left above all to the right.
The bottom off the rectangle must hit the uppersite of the"stairway"
Effects - Geometric effects - Spheric (strenght = 100
Form= cirkle)
Selections - select none!
*Step 3
Add a new rasterlayer.
Selections - Load from disc - and look for your selection les 002.
Only replace selection and luminance of source selected.
Click on load.
Now there will be a selection in your image.
Flood Fill this selection met the gradient thats still in your
forground color.
Effects - Reflection - Kaleidoscope
Everywhere 0, accept by repeat. Put that one on 10. Reflection
selected.
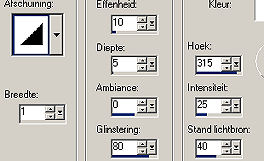
Effects - 3D effects - Inner Bevel with the next settings:

Selections - Select none
*Step 4
Click left on the upper layer in the
layer palette.
Open the tube with the woman now. Copy the tube and past is as a new
layer in your image.
Place her with your movetool to the leftsite of the stairs.
Effects - 3D effects - Dropshadow (1-1-65-1)
Repeat the Drop Shadow, but place a minus before the 1 from vertical
en horizontal
*Step 5
Add a new rasterlayer.
Select your texttool and use this settings:

Type your name or an other text.
Because you've made a selection off the characters you will only see
a dotting line.
Click with your right mousebutton on the selection with the movetool
to place the characters to the right of the bottom of the stair.
Flood Fill the characters with the gradient from the forground color
(Metal-Steel.
Effects - 3D effects - Drop Shadow (1-1-65-1)
*Step 6
Add a white border off 10
pixels.(say yes to merge layers)
Selecte the border (tolerance = 0) and flood fill the border with
the gradient.
Effecten - Geometric effects - Skew (horizontal
checked, angle 25 and color is black)
Selections - Invert
Effects - 3D effects - Cut out (10-10-55-22) Shadowcolor is black
Repeat this step, but place a minus before horizontal en vertical
Selecties - Invert
Effects - 3D effects - inner bevel with the same settings as in step
3.
These settins are still there if you havent done anything else in
between.
Selections - select none.
If you wish, uou can rezise your image now.
Let me give you a tip
In the window where you rezise your image: check resampling using -
bicubic.
Now you don't have to sharpen your image after rezising.
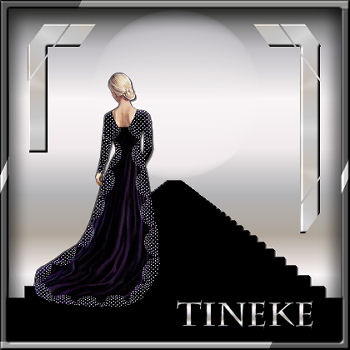
Your image is ready. It's not so coloured, but more a little
symbolic.
Now you know how to use a selection that's on your disk.
|
